# Amazon Mechanical Turk
Once you have designed and tested your experiment locally you may want to run an experiment online using AMT workers. You will need a publicly accessible server with a domain name and SSL certificate, an AMT Requester Account, and a properly configured copy of breadboard running on your server. This guide will walk you through the steps necessary to get your experiment up and running with AMT participants.
This guide assumes you've already completed setting up a server and installing an SSL certificate
# Creating an AMT Requestor Account
In order to create Human Intelligence Tasks (HITs) using Amazon Mechanical Turk you need to create a Requester account. Additionally, you need to create an Amazon Web Services (AWS) account in order to grant permission for breadboard to access AMT via the API.
- Go to requester.mturk.com (opens new window) and sign up for a new Requester account
- You also need an Amazon Web Services (AWS) account, sign up here (opens new window)
- Log into your AWS account and click on "Identity & Access Management" under the Security & Identity category
- Click on Users and click the Add user button
- Assign a user name and check "Programmatic access" for the Access type, click "Next: Permissions"
- Select "Attach existing policies directly" and check the "AmazonMechanicalTurkFullAccess" policy, click "Next: Review"
- Click "Create user"
- Copy the Access key ID and Secret access key and keep them in a safe place, you will not be able to retrieve them later. Important: The Access key ID in combination with the Secret access key will allow anyone full access to your AMT Requester account, do not commit this key to public source code repositories or share with untrusted users
# Configuring breadboard for Amazon Mechanical Turk
At this point you should have a server configured with a domain name, created and installed a SSL certificate, and have a public and private key for an Amazon Web Services user. You are now ready to configure breadboard to use the SSL certificate and AWS credentials.
- Install breadboard on the server
- Unzip breadboard into a directory on the server where you have write privileges (such as your home directory)
- Edit the application-prod.conf file
- Open the
conf/application-prod.conffile in the breadboard directory using a text editor (nano, vi, emacs)nano ~/breadboard-v2.3.X/conf/application-prod.conf - Comment out the
breadboard.rootUrlandbreadboard.wsUrllines underDEV httpby prepending each line with#characters - Uncomment the lines under
PRODand change the domain name to your domain:
# PROD
breadboard.rootUrl="https://[YOUR DOMAIN NAME]:9443"
breadboard.wsUrl="wss://[YOUR DOMAIN NAME]:9443/connect"
- Edit the breadboard.sh file and add or change the following environment properties:
application.secretshould be a string unique to each instance of breadboardhttps.portshould be 9443 andhttp.portshould be 9000- You can change these ports if you want to run two instances of breadboard on the same server, remember to open the ports in your server's firewall and change the ports for rootUrl and wsUrl in application-prod.conf as detailed above
https.keyStoreshould point to the location of your keystore file, for instance/home/[YOUR USER NAME]/.keystorehttps.keyStorePasswordshould be the password you provided when creating your SSL certificateAMT_ACCESS_KEYshould be the public key for your AWS userAMT_SECRET_KEYshould be the secret key for your AWS userconfig.fileshould point to the location of the application-prod.conf file
Example breadboard.sh:
  #!/bin/sh
  ./start -Dapplication.secret="changethis" -Dhttps.port=9443 -Dhttp.port=9000 -Dhttps.keyStore="/home/ubuntu/.keystore" -Dhttps.keyStorePassword="yourpasswordhere" -DAMT_ACCESS_KEY=AKIABCDEFGHIJKLMNOPQ -DAMT_SECRET_KEY=aBcDeFgHiJkLmNoPqRsTuVwXyZ0123456789 -Dconfig.file=application-prod.conf
- Launch breadboard using nohup so that it will continue running even when you close your shell session
nohup ./breadboard.sh &
- You can view the log of the running instance of breadboard with the following command:
tail -f nohup.out
- Go to https://[YOUR DOMAIN NAME]:9443 and log into breadboard
- To terminate breadboard, run:
kill $(cat RUNNING_PID)
# Creating a HIT
The Create HIT options can be found in the AMT dialog. Before creating a HIT you will have to properly configure breadboard with your AMT credentials.
Before submitting a HIT, make sure you have launched a new Experiment Instance using the Launch dialog. To submit a HIT to AMT fill out the form in the AMT dialog and click the "Create HIT" button:
# Important Experiment Considerations
# Paying players
When an AMT worker is done with a game they need to submit the HIT in before they can be paid. After they have submitted the HIT, you will have a chance to review their submission before approving their pay. Breadboard provides a default form for submitting HITs which can be show to players after the game is complete. Once the worker has submitted their HIT they will appear in AMT Dialog and their pay can be reviewed before approving it.
# Example
finishStep = stepFactory.createStep()

finishStep.run = {
  g.V.each { v->
    v.text = "<h2>Thank you for participating in this task.</h2>"
    v.text += "<p>Please submit the assignment below.</p>"
    v.text += g.getSubmitForm(v, v.score)
  }
}
For more information about the getSubmitForm method refer to the API Documentation.
# Dealing with inactive players
AMT players will occasionally not finish or start the game after joining. This must be handled using experiment code and can be solved in several different ways. With synchronous experiments it is usually a good idea to make sure that all players are still active by checking if they are still actively submitting choices. Typically, this would be done using a timer that resets whenever the player sends some activity. This gives the player some amount of time to perform an action before being told that they will be dropped from the game.
Fortunately, Breadboard has some helpful methods built in to deal with this situation.
// TODO What is the correct way to drop a player?
If you do drop players or start the game before players are ready you will have to filter out those players as the game proceeds. In the example PublicGoods Experiment we set an active property of the nodes and filter out inactive players using the g.V.filter{it.active} method.
# Details
All of the parameters available in the HIT submission form and their descriptions.
| Parameter | Description |
|---|---|
| Title | This should be a short (< 128 characters), descriptive, title to identify the task. |
| Description | This is a general description of the HIT and should give the worker any information they need to know before accepting the HIT, including the approximate length of the task. |
| Reward | This is the amount, in US Dollars, that the workers will receive on completion of the task. This does NOT include any bonus you will apply based on the performance of the workers. |
| Max Assignments | This is the maximum number of workers allowed to accept your HIT. Keep in mind that you are not guaranteed a number of players equal to the Max Assignments parameter. You will have to over-recruit in order to obtain a specific number of players. |
| HIT lifetime (in seconds) | This is the amount of time, in seconds, after you press the "Submit AMT Task" button that the workers will have to claim an assignment and join your game. |
| Tutorial time (in seconds) | This is the additional time, after the HIT lifetime has expired, that you will allow players to complete the tutorial and comprehension test before the game begins. |
| Assignment duration (in seconds) | This is the total time AMT will allow your players to participate in the task. If this timer expires before your experiment has finished, the game will end and your players will be unable to submit their assignments. |
| Keywords (for HIT search) | These is a comma separated list of terms workers can use to search for your HIT. |
| Allow repeat play? | This option allows you to prevent repeat play. Block previous players of THIS experiment prevents players who have played this experiment before, Block previous players of ANY experiment prevents players who have participated in any experiments on your installation of breadboard, and Allow repeat play allows repeat play. |
| Start initStep automatically when HIT lifetime and tutorial time expire? | If this box is checked then breadboard will start your experiments InitStep automatically when the sum of Hit lifetime + Tutorial time elapses. breadboard will also set a global startAt variable with the timestamp when the InitStep will begin which can be used to display a countdown to your players. |
# Managing qualifications
The Manage qualifications tab allows you to associate a custom qualification with your experiment to track AMT workers and prevent repeat play.
To get started with breadboard participant qualifications, click the AMT dialog and select the Manage qualifications tab.
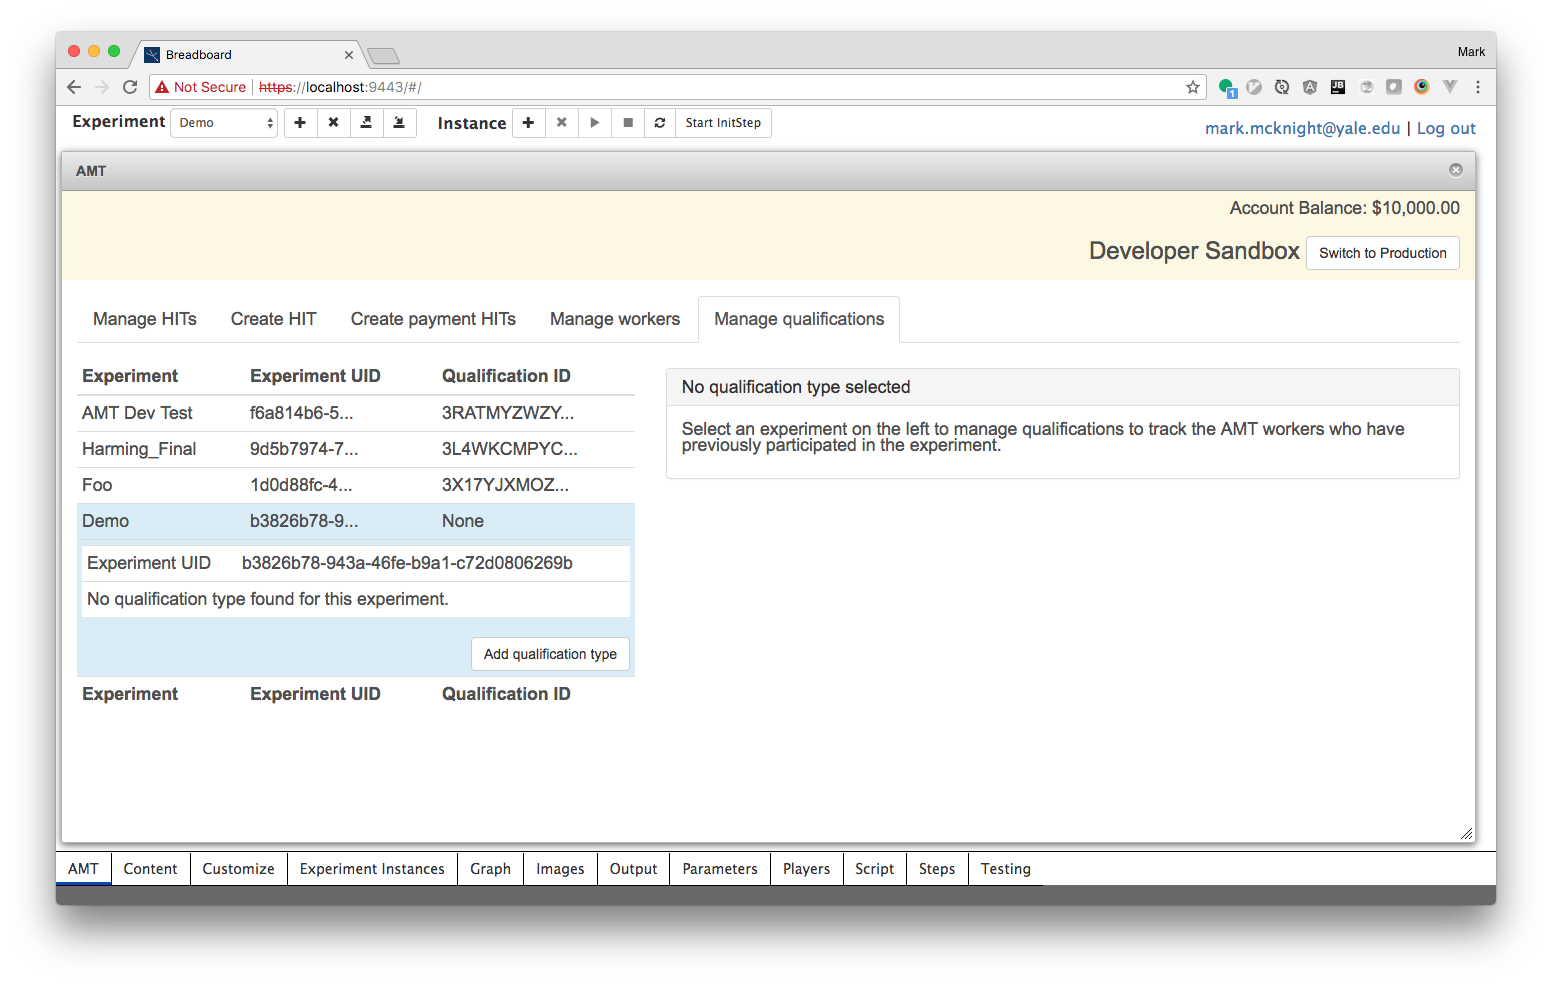
Select your experiment and click the 'Add qualification type' button to create a new qualification type associated with your experiment.
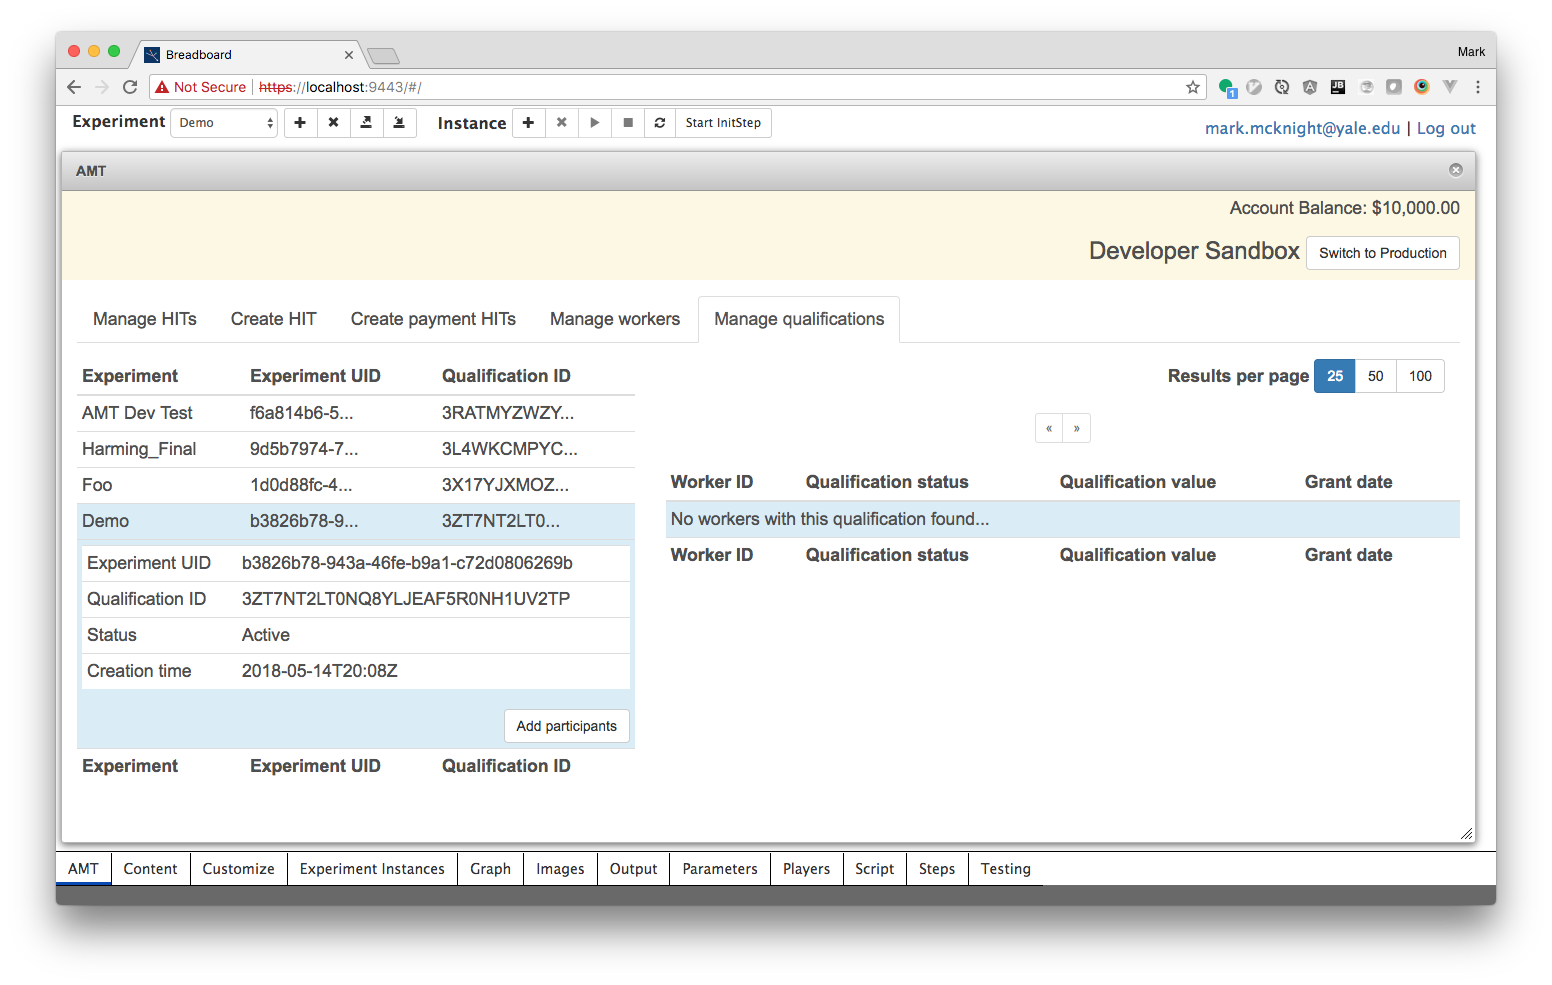
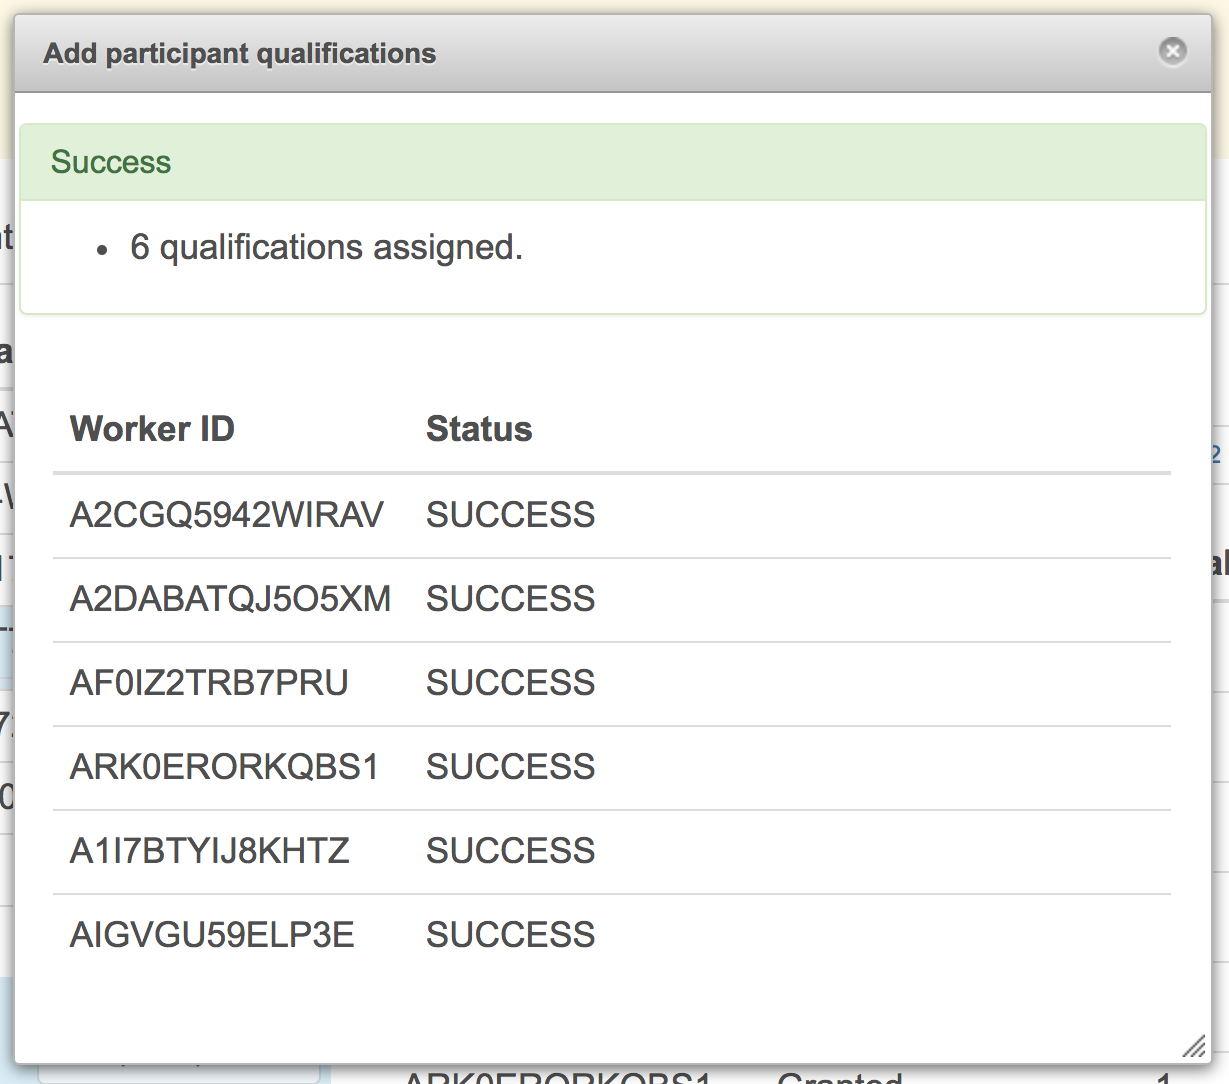
Click the 'Add participants' button to preload in a list of worker IDs who have previously participated in your experiment.
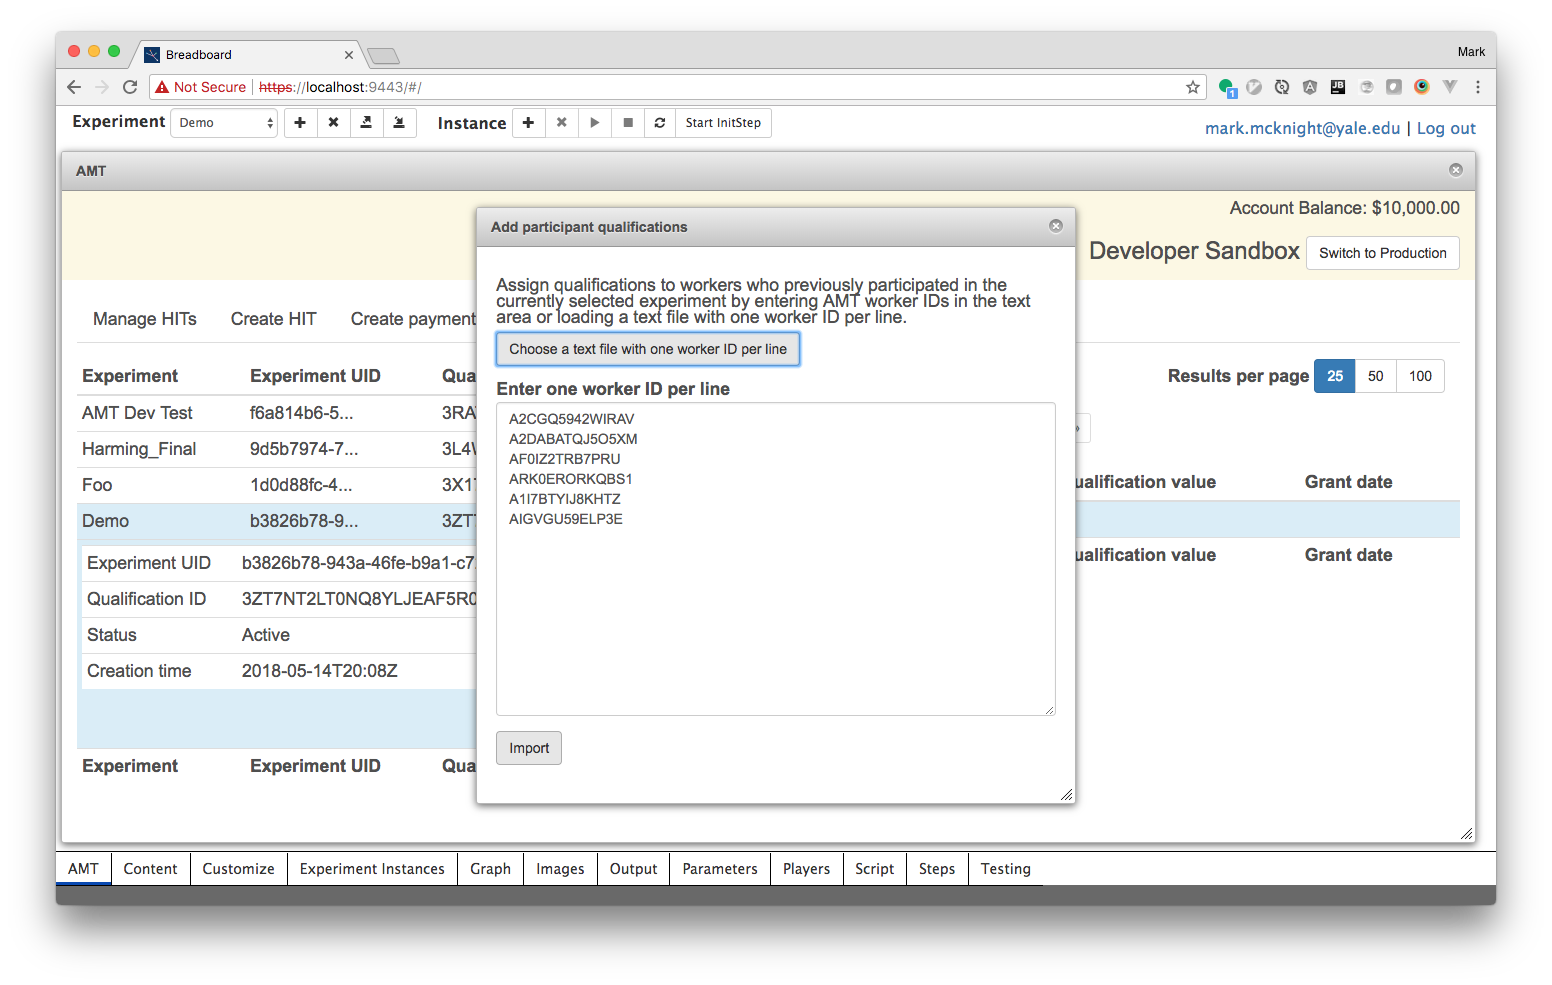
You can paste the worker IDs into the text area or load them from a text file with one worker ID per line.
After adding qualifications to previous players you can limit workers who can discover, preview, and accept your HIT by using the Qualification requirements section of the Create HIT form.
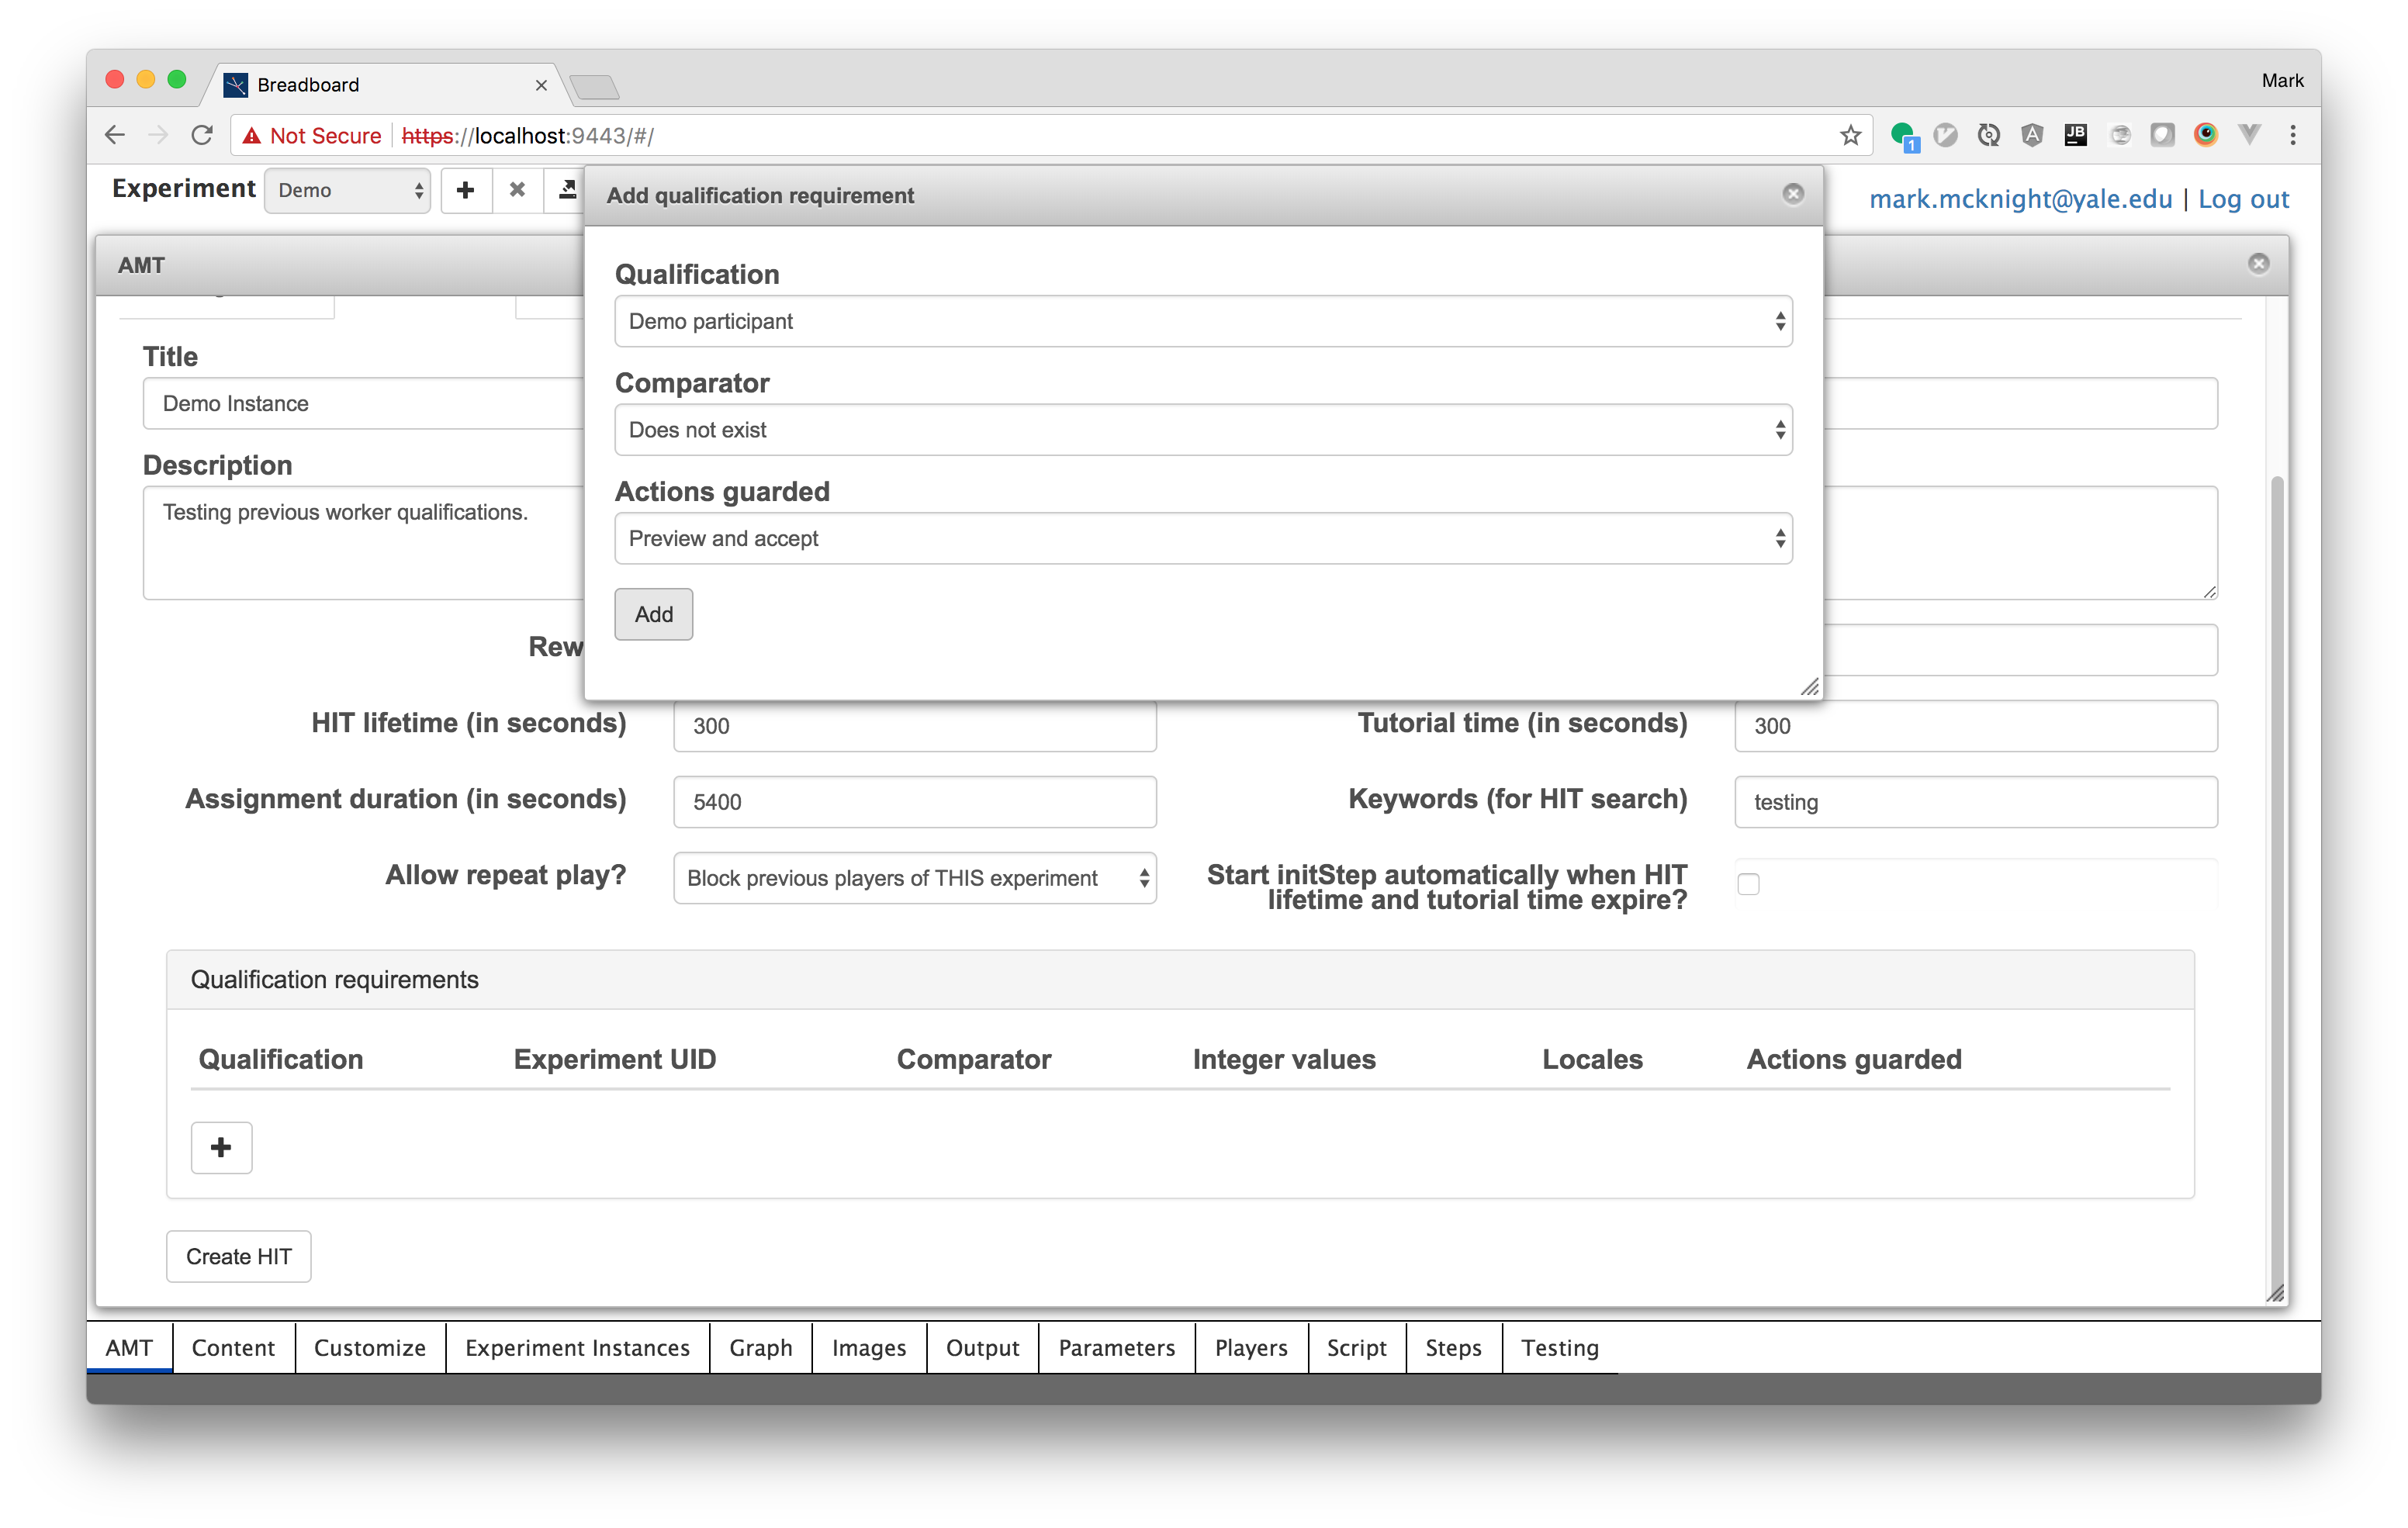
To prevent previous participants from previewing, or accepting your HIT select the 'participant' qualification associated with your experiment's name, select 'Does not exist' from the comparator drop-down and select 'Preview and accept' from the actions guarded drop-down.

Participants with the associated qualification will receive a 'Requirements not met' message and will be unable to preview or accept the HIT.
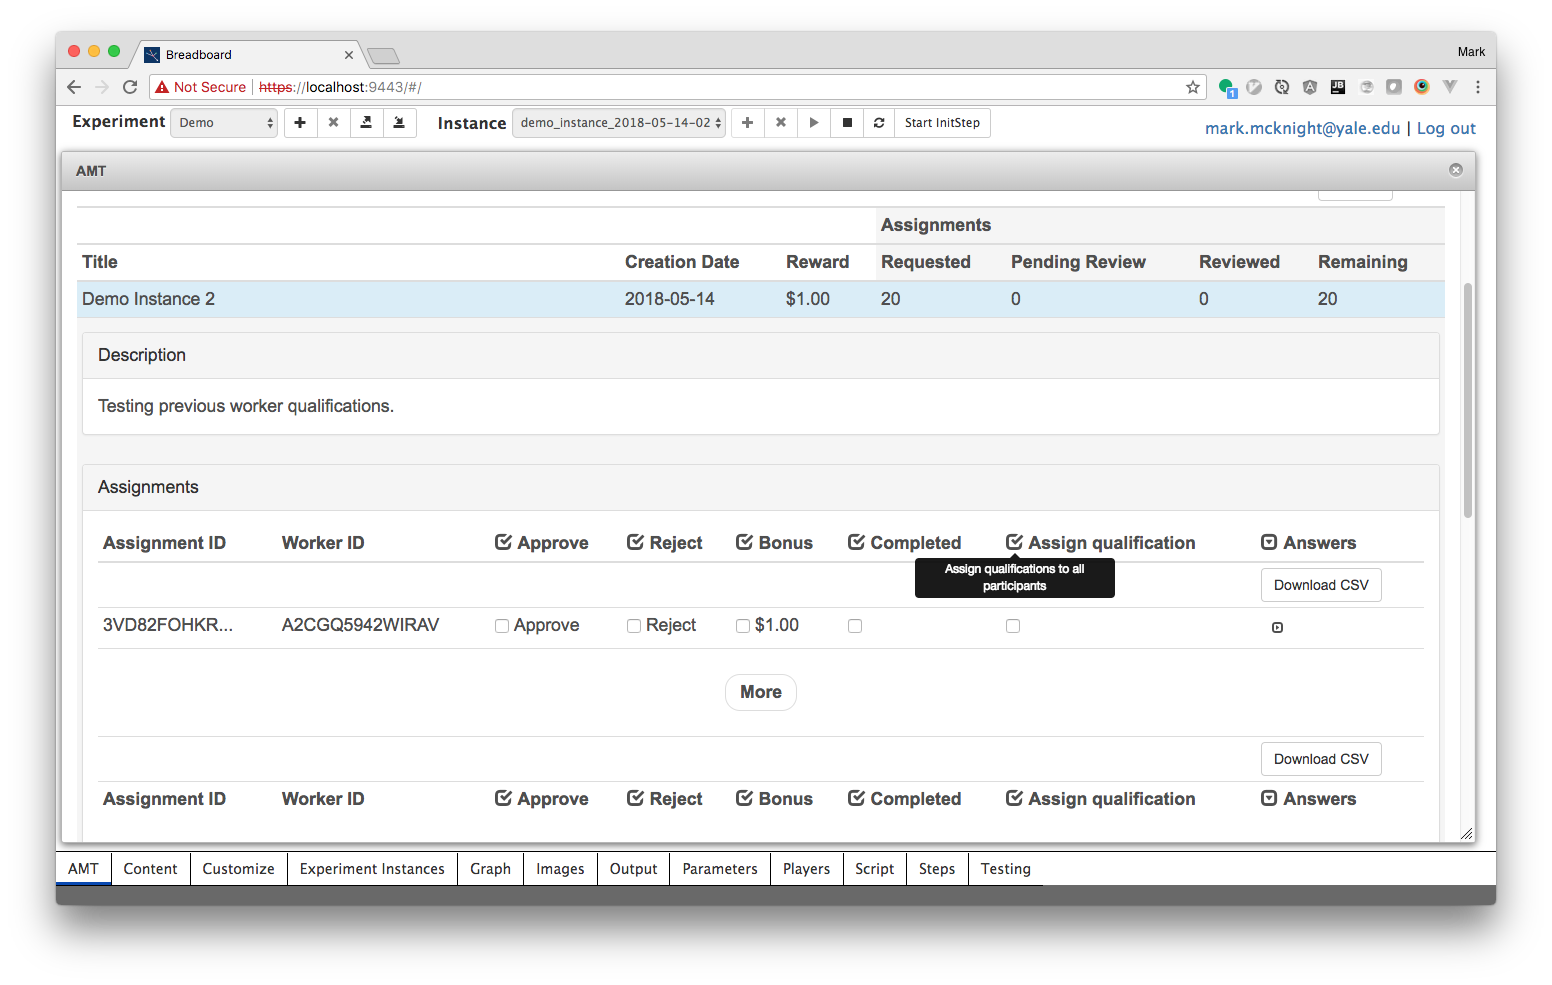
After running an instance of your experiment you can quickly assign the qualification to your workers by using the 'Assign qualification' checkbox in the Manage HITs tab.